Use the following steps, in order, until the drive door opens:
CAUTION: After opening the door, if you find that a disc has broken and has left fragments inside the drive, try to find and match all pieces of the disc. If all pieces cannot be found, the drive should be replaced as the damaged pieces can cause further damage to the computer and other discs.
Restart the computer.
If the keyboard has a disc Eject key, press it. The Eject key is usually placed by the volume knob and is marked by a triangle pointing up with a line underneath.
In Windows 7 or Windows Vista, click Start , and then click Computer.In earlier versions of Windows, click Start, and then click My Computer.
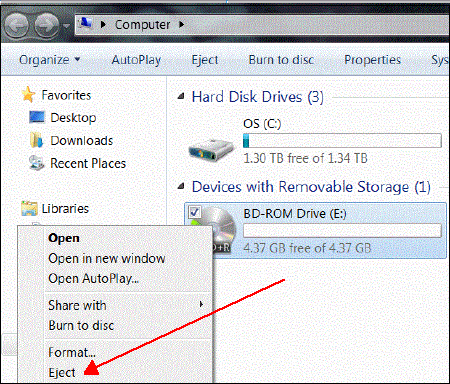
Right-click the icon for the disc drive that is stuck, and then click Eject. Figure : Eject disc in Windows 7
The disc tray should open. If it does not, continue following these steps.
If the drive door button is a long clear plastic bar on the front of the computer, press firmly on the right side of bar. Some models have a button on the front panel of the computer to the right of the hinged door. Press the button to eject the drive.
If the drive door button is part of the computer case and is covering the actual drive door, open the door that is part of the computer case and press the Eject button on the faceplate of the drive.
Restart the computer and press the Eject button on the front of the drive when the first screen appears (before Windows launches). If the drive door opens this way, but does not open in Windows, another software program is taking control of the disc driver. Try shutting down or configuring any software programs that create discs or monitor the disc drive.
If it doesn't open:
Close all programs and shut down the computer.
Unplug the power cord from the power outlet.
Look for the small hole on the faceplate of the disc drive. This is the manual release hole. The location of the manual release hole will vary.
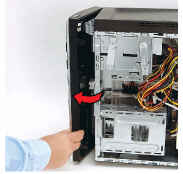
NOTE: On some models, it is necessary to remove the front panel to expose the manual release hole. Check the documentation that came with your computer for information about removing the front panel.
Figure : Removing the front panel
NOTE: On some models, the release hole and the drive activity LED look similar and are about the same size. Do not force the paper clip into the hole if it does not go in. Make sure that the hole is not actually the LED.
Figure : Possible location of manual release hole
Straighten the paper clip and insert it into the manual release hole until resistance is felt.
Press in gently on the paper clip until the tray is released.
Releasing the lock will allow the tray to open a small distance.
Remove the paper clip and gently pull out the drawer until the disc is accessible.
Remove the disc from the tray and turn on the computer.
When I connect an external microphone to the jack, it is not working. I can see it in the "Sound" tab, but the levels is very low. I have tried with several microphones.